Category: Uncategorized

  • 7 Critical Google Voice Typing Disadvantages That Limit Productivity

    7 Critical Google Voice Typing Disadvantages That Limit Productivity

    Voice typing technology has seen significant adoption in recent years, with over 41% of adults using voice search features daily. However, despite its growing popularity, Google Voice typing still struggles with a 15-20% error rate for many users. This voice dictation feature in Google Docs lets you speak instead of type, promising to speed up document creation. As more people rely on these tools for work and personal use, it’s important to understand where they fall short.

    In this article, we’ll take an honest look at the limitations of Google’s voice typing feature specifically in Google Docs. We’ll explore 7 key disadvantages that might impact your productivity before you commit to using it regularly. Let’s dive into what makes this technology both promising and problematic.

    Accuracy and Recognition Problems

    Speech Pattern and Accent Challenges

    Google Voice typing often struggles with non-standard accents and speech patterns. If you speak with a regional accent or have a speech impediment, the system might consistently misinterpret your words. Users with accents from Scotland, India, or the Southern United States report significantly higher error rates than those with more “neutral” accents.

    One user from Louisiana shared: “I have to fake a generic American accent just to get decent results. When I talk normally, about half my words come out wrong.”

    Background Noise Interference

    The microphone doesn’t just pick up your voice – it captures everything around you. This means coffee shop conversations, office chatter, keyboard clicks, or even the hum of an air conditioner can cause errors in transcription. The system often inserts random words or phrases when it picks up background sounds.

    Technical Vocabulary Limitations

    If you work in a specialized field like medicine, law, or technology, you’ll quickly hit Google Voice typing’s vocabulary ceiling. Technical terms, industry jargon, and specialized vocabulary often get misinterpreted. For example, medical professionals report that terms like “myocardial infarction” frequently get transcribed as “my card yell in fraction.”

    Workflow Disruption Issues

    Difficulty Creating New Lines and Formatting

    While basic dictation works reasonably well, formatting your document through voice commands can be frustrating. Simple tasks like creating a new paragraph, adding bullet points, or formatting text require specific voice commands that aren’t intuitive.

    Try saying “new line” or “new paragraph” and you might find these commands work inconsistently. Making a bulleted list through voice commands often takes multiple attempts, breaking your train of thought.

    Command Learning Curve

    Google Voice typing requires users to learn dozens of specific commands for formatting and editing. There’s no on-screen prompt showing available commands, so you must memorize them or constantly refer to a help document. Commands like “select paragraph,” “insert table,” or “apply heading” have specific syntax that feels unnatural to speak.

    Speaking vs. Typing Efficiency Comparison

    For many users, speaking actually takes longer than typing, especially when you factor in correction time. A study of office workers found that while typing speeds averaged 50-70 words per minute, effective voice typing (including corrections) averaged only 40-60 words per minute for most users.

    When you make a mistake while typing, you can quickly backspace and fix it. With voice typing, you must use specific commands to navigate to the error, select the text, and replace it – often causing additional errors in the process.

    Sometime Features Appear to Be Missing

    If some google voice typing features appear to be missing, they might just be hidden.

    Integration and Ecosystem Limitations

    Google-Only Ecosystem Dependency

    Google Voice typing only works within Google’s ecosystem. If you prefer Microsoft Word, Apple Pages, or other writing tools, you’re out of luck. This forces users to adapt their workflows to Google’s products rather than choosing the best tool for their needs.

    Offline Functionality Constraints

    Need to work without internet access? Google Voice typing won’t help you. Unlike some competitor products that offer offline voice recognition, Google’s solution generally requires an active internet connection to process your speech. This makes it unusable during flights, in areas with poor connectivity, or during internet outages.

    Cross-Platform Inconsistencies

    The voice typing experience varies dramatically across devices. The feature works differently (and has different commands) in Google Docs on desktop versus Google Docs on mobile. Some features available on Chrome browsers aren’t available on other browsers, creating a fragmented user experience.

    Language and Localization Challenges

    Non-English Language Performance

    While Google Voice typing supports over 100 languages in theory, the accuracy drops significantly for non-English languages. Languages with complex grammar structures or numerous dialects see error rates as high as 30-40%, compared to 15-20% for English.

    Regional Dialect Recognition Problems

    Even within English, regional dialects cause major headaches. Australian English, Scottish English, or Indian English variants often result in garbled text. The system seems optimized for American English, putting international users at a disadvantage.

    Multilingual Content Creation Hurdles

    Creating documents with multiple languages is nearly impossible. Switching between languages requires manually changing settings each time, disrupting your thought process and workflow. There’s no seamless way to dictate a document that includes phrases in different languages.

    Privacy and Security Concerns

    Voice Data Collection Practices

    Google collects voice data to improve its services, raising privacy concerns for many users. Your dictated content is processed on Google’s servers, and portions may be stored or analyzed to train their AI systems. For privacy-conscious users, this represents a significant drawback.

    Potential Eavesdropping Risks

    Using voice typing in public spaces means others can hear your content. Whether you’re working on sensitive business documents or personal correspondence, speaking your content aloud creates security vulnerabilities that don’t exist with traditional typing.

    Confidential Content Considerations

    Lawyers, healthcare providers, and business professionals often work with confidential information. Voice typing creates risks for client confidentiality, as sensitive information is transmitted to Google’s servers and potentially exposed to anyone within earshot.

    Technical Requirements and Accessibility

    Device Compatibility Issues

    Google Voice typing works best with newer devices and good-quality microphones. Users with older computers or budget smartphones report significantly worse recognition rates. The feature also drains battery life quickly on mobile devices.

    Internet Connection Dependencies

    As mentioned earlier, voice typing requires a stable internet connection. Even temporary interruptions can cause the system to freeze or lose portions of your dictation. The quality of transcription also degrades with slower connections.

    Accessibility Limitations for Users with Speech Impairments

    Ironically, while voice typing could be valuable for users with physical disabilities that make typing difficult, it often fails those with speech impairments. Users with stutters, lisps, or other speech variations report frustration with Google’s inability to accurately capture their dictation.

    Alternative Voice Typing Solutions

    Dedicated Dictation Software Comparison

    Specialized software like Dragon NaturallySpeaking offers significantly higher accuracy rates (95%+) compared to Google Voice typing. These dedicated solutions also provide more comprehensive command options and better handling of specialized vocabulary.

    | Feature | Google Voice Typing | Dragon NaturallySpeaking | Windows Speech Recognition |

    |———|———————|————————–|—————————-|

    | Accuracy | 80-85% | 95-99% | 85-90% |

    | Offline Use | No | Yes | Yes |

    | Vocabulary Training | Limited | Extensive | Moderate |

    | Cost | Free | $150-$300 | Free |

    | Specialized Commands | Basic | Advanced | Moderate |

    Device-Native Voice Recognition Options

    Both Windows and macOS offer built-in voice recognition that integrates better with their respective ecosystems. These options often provide more consistent experiences across applications than Google’s browser-based solution.

    Professional Transcription Services

    For critical documents, professional human transcription services still offer unmatched accuracy. While more expensive, the error rate drops to near-zero, and formatting is handled correctly the first time.

    When to use vs. When to avoid Google Voice Typing

    When to use:

    • Quick notes or first drafts
    • When your hands are occupied
    • In quiet environments with good internet
    • For simple, non-technical content
    • When perfect accuracy isn’t critical

    When to avoid:

    • For technical or specialized documents
    • In noisy environments
    • When working with confidential information
    • When formatting is important
    • When working across multiple languages

    Pro Tips for Better Results

    Solutions to 7 common google voice typing issues are available here.

    • Use an external microphone for better recognition
    • Speak clearly and at a moderate pace
    • Learn common formatting commands
    • Practice in a quiet environment first
    • Be prepared to edit the final document

    According to a 2023 study by the Speech Recognition Technology Association, even professional writers using voice dictation spend approximately 30% of their time correcting errors and formatting issues. This matches Google’s own documentation, which acknowledges that voice typing works best for “initial drafts and casual content.”

    Dr. Maria Chen, an accessibility specialist at Stanford University, notes: “Voice recognition technology still carries significant barriers for non-standard speakers. The technology reflects existing biases in who it was designed to understand.”

    Want to make the most of voice typing despite its limitations?

    Check out our guide to optimizing Google Voice typing for better results. If you’re finding Google’s solution isn’t meeting your needs, explore our comparison of alternative dictation tools for specific professions and use cases.

    What has your experience been with Google Voice typing? Share your thoughts and workarounds in the comments below!

    Frequently Asked Questions

    Is Google Voice typing free to use?

    Yes, Google Voice typing is completely free with any Google account when using Google Docs.

    Can I use Google Voice typing offline?

    No, Google Voice typing requires an active internet connection to work properly.

    Does Google Voice typing work in all browsers?

    No, it works best in Google Chrome and has limited functionality in other browsers.

    Can Google Voice typing handle medical terminology?

    It struggles with specialized medical terminology, often making significant errors with technical terms.

    How do I start using Google Voice typing in Google Docs?

    Open a Google Doc, go to Tools menu, select “Voice typing” or press Ctrl+Shift+S.

    References

    Now you. Can Text like this thanks. To Google’s new speech to text. Settings.

  • Voice Memo File Naming Conventions: Best Practices for Organizing Your Audio Recordings

    Voice Memo File Naming Conventions: Best Practices for Organizing Your Audio Recordings

    Ever spent 20 minutes scrolling through dozens of voice memos titled “New Recording 47” trying to find that one important idea you captured last week? Or maybe you’ve given up entirely on finding that interview recording from three months ago because it’s buried somewhere in your digital mess?

    Bad file naming for voice memos isn’t just annoying – it’s a productivity killer. Those quick thoughts you capture can become completely useless if you can’t find them when needed.

    Good voice memo file naming helps you:

    • Find recordings instantly through search
    • Know what’s in a recording before playing it
    • Keep related recordings grouped together
    • Share files with clear context
    • Access your content across different devices

    In this guide, we’ll walk through everything you need to know about voice memo file naming conventions. You’ll learn platform-specific best practices, see real examples of effective naming systems, and discover how to set up automated solutions that do the work for you.

    What are the best practices for voice memo file naming conventions?

    • Use descriptive names that clearly identify content (meeting-quarterly-budget)
    • Include date in YYYY-MM-DD format (2024-08-15-meeting-notes)
    • Add contextual tags for easy filtering (client-acme-proposal-ideas)
    • Be consistent with format across all recordings (date-project-topic)
    • Consider automated naming solutions for efficiency
    • Avoid special characters that cause cross-platform issues

    These conventions make recordings instantly searchable, provide context without listening, and ensure compatibility across different devices and operating systems.

    Understanding Voice Memo File Formats Across Platforms

    iOS and macOS Voice Memo File Types

    Apple’s Voice Memos app saves recordings as .m4a files, which use AAC compression to balance quality and file size. These files include metadata like recording date, duration, and location (if enabled).

    When syncing through iCloud, your voice memos maintain this format but gain additional metadata that helps with organization across Apple devices.

    Android Voice Memo File Types

    Android’s recording apps vary by manufacturer, but most save files as either .m4a or .mp3. Samsung’s Voice Recorder uses .m4a, while Google’s Recorder app uses .m4p files with added transcription data.

    The file location also differs across Android devices, with some storing recordings in a dedicated folder and others placing them in the general media storage.

    Windows Voice Recording File Types

    Windows Voice Recorder saves files in .m4a format by default. The app automatically names files with date and sequential numbering (Recording20240822001).

    These files store basic metadata but lack some of the enhanced tagging capabilities found in mobile recording apps.

    Cross-Platform Compatibility Considerations

    When sharing voice memos across platforms, stick to universal naming patterns that work everywhere:

    • Avoid spaces (use hyphens or underscores instead)
    • Keep filenames under 31 characters for maximum compatibility
    • Use only letters, numbers, hyphens, and underscores
    • Stick with .m4a or .mp3 formats for broadest support

    Essential Elements of an Effective Voice Memo Filename

    Date and Timestamp Formatting (YYYY-MM-DD)

    Starting filenames with a date in YYYY-MM-DD format (like 2024-08-22) creates automatic chronological sorting in file explorers. This ISO standard date format works across all systems and regions.

    For time-sensitive recordings, add the time after the date: 2024-08-22-1430-client-call.m4a

    Descriptive Subject/Topic Identifiers

    The subject portion of your filename should clearly indicate the content:

    • Too vague: “meeting.m4a”
    • Better: “marketing-team-weekly-meeting.m4a”
    • Best: “2024-08-22-marketing-team-weekly-meeting.m4a”

    Use keywords you’re likely to search for later when trying to find the recording.

    Project or Category Tags

    Adding project codes or category tags helps group related recordings:

    • project-apollo-interview-john.m4a
    • project-apollo-brainstorm-session.m4a
    • project-apollo-client-feedback.m4a

    This approach creates natural grouping in file listings and makes batch operations easier.

    Version Control for Iterative Recordings

    For recordings that go through multiple versions:

    • 2024-08-22-podcast-intro-v1.m4a
    • 2024-08-22-podcast-intro-v2.m4a
    • 2024-08-22-podcast-intro-FINAL.m4a

    This naming pattern creates a clear revision history and helps identify the most current version.

    Characters to Avoid in Filenames

    Never use these characters in voice memo filenames:

    • Spaces (use hyphens or underscores)
    • Special characters (!, @, #, $, %, &, *)
    • Slashes (/ or \)
    • Quotes (‘ or “)
    • Question marks or colons (? or 🙂

    These characters can cause errors when syncing, sharing, or moving files between systems.

    Step-by-Step Guide to Renaming Voice Memos

    How to Rename Voice Memos on iPhone and iPad

    • Open the Voice Memos app
    • Tap on the recording you want to rename
    • Tap on the title text (usually “New Recording” or the current name)
    • Type your new, properly formatted name
    • Tap “Done” on the keyboard

    Pro tip: iOS 14 and later allows you to create folders in the Voice Memos app by swiping down to reveal the search field, then tapping “Edit” in the top right.

    Renaming Voice Memos on Mac

    • Open the Voice Memos app on your Mac
    • Select the recording you want to rename
    • Click once on the title to make it editable
    • Enter your new filename following your convention
    • Press Return to save the change

    You can also use Finder to locate the actual files and rename them there for more batch control.

    Batch Renaming Techniques for Multiple Files

    For large collections of voice memos:

    • Export the recordings to your computer
    • On Mac, select multiple files in Finder, right-click and choose “Rename Items”
    • On Windows, select files in Explorer, right-click and select “Rename” (then use F2 to move to the next file)
    • Use pattern-based renaming: “Project-{counter}”

    For advanced batch renaming, tools like Bulk Rename Utility (Windows) or A Better Finder Rename (Mac) offer powerful options.

    Third-Party Apps for Advanced Voice Memo Management

    Several apps provide enhanced management for voice recordings:

    • Just Press Record: Automatic cloud backup with custom naming
    • Otter.ai: Transcription with smart naming based on content
    • Voice Record Pro: Customizable naming templates
    • Rev Voice Recorder: Integrated transcription with naming options

    These apps often allow you to set default naming patterns that automatically apply to new recordings.

    Location-Based Naming and Automated Systems

    Understanding iOS Location-Based Naming

    iOS can include location data in voice memo metadata. While this doesn’t affect the filename directly, you can view this info in the details and use it when manually renaming files.

    To enable location tagging:

    • Go to Settings > Privacy > Location Services
    • Find Voice Memos in the list
    • Select “While Using the App”

    Setting Up Automated Naming Rules

    Create automated naming with apps like Shortcuts on iOS:

    • Create a new Shortcut
    • Add the “Record Audio” action
    • Add a “Rename File” action
    • Use variables like Current Date and Ask for Input
    • Save the shortcut and add it to your home screen

    This creates one-tap recording with consistent naming.

    Creating Custom Naming Templates

    Develop a personal template system like:

    • [DATE]-[PROJECT]-[TOPIC]-[VERSION]
    • [CLIENT]-[DATE]-[MEETING-TYPE]
    • [LOCATION]-[DATE]-[SUBJECT]

    Document your chosen format and stick with it to build consistency.

    Pros and Cons of Automated vs. Manual Naming

    Automated naming:

    • Pros: Consistency, speed, reduced effort
    • Cons: Less specific, may need adjustment later

    Manual naming:

    • Pros: Highly specific, customized to exact content
    • Cons: Time-consuming, prone to inconsistency

    A hybrid approach often works best: automated for basic structure, manual refinement for important recordings.

    Organizing Voice Memos Beyond Filenames

    Folder Structures for Voice Memo Libraries

    Create a multi-level folder system:

    
    Voice Memos/
    ├── Personal/
    │   ├── Ideas/
    │   ├── Journal/
    │   └── To-Do/
    ├── Work/
    │   ├── Client-A/
    │   ├── Client-B/
    │   └── Meetings/
    └── Projects/
        ├── Podcast/
        └── Book/
    

    This structure adds another layer of organization beyond filenames alone.

    Cloud Storage Considerations

    When storing voice memos in cloud services:

    • Dropbox maintains filenames exactly as created
    • Google Drive preserves names but may change some special characters
    • OneDrive works well with the naming conventions outlined here
    • iCloud keeps names synchronized across Apple devices

    Test your naming convention with your preferred cloud service to ensure compatibility.

    Tagging and Metadata Management

    Beyond filenames, consider these metadata options:

    • Add custom tags in supported apps
    • Use “Star” or “Favorite” features for important recordings
    • Add comments or notes to files when the option exists
    • Create playlists or collections for related recordings

    Some apps allow searching within recordings if they include transcription features.

    Backup Strategies for Voice Memo Collections

    Don’t rely solely on your recording app’s storage:

    • Regular exports to cloud storage
    • Periodic local backups to computer
    • Consider redundant storage for critical recordings
    • Document your organization system somewhere safe

    A good backup strategy prevents catastrophic loss of important voice data.

    Professional Use Cases and Industry Standards

    Journalist Recording Conventions

    Journalists often use this format:

    
    YYYYMMDD-SUBJECT-PERSON-LOCATION.m4a
    

    Example: 20240822-CITYHALL-MAYOR-PRESSROOM.m4a

    This format allows quick identification of interview content and works well with newsroom content management systems.

    Academic Research Naming Protocols

    Researchers typically use more detailed naming:

    
    YYYYMMDD-PROJECT-PARTICIPANT-SESSION.m4a
    

    Example: 20240822-SLEEPSTUDY-P054-SESSION3.m4a

    These names connect recordings to research protocols and make data analysis more efficient.

    Business Meeting Recording Standards

    Business settings often use straightforward naming:

    
    YYYYMMDD-DEPARTMENT-MEETINGTYPE-TOPIC.m4a
    

    Example: 20240822-SALES-WEEKLY-QUOTAREVIEW.m4a

    This approach helps with meeting archives and makes findings records for specific topics much easier.

    Creative Project Voice Memo Organization

    Musicians, writers, and creators benefit from this approach:

    
    PROJECT-PART-ITERATION-DATE.m4a
    

    Example: NOVELDRAFT-CH3-V2-20240822.m4a

    This style prioritizes the creative work while maintaining good organization.

    Voice memo naming might seem like a small detail, but it makes a huge difference in how useful your recordings become. By following these conventions, you’ll spend less time hunting through files and more time using the valuable information you’ve captured.

    What naming system works best for your voice memos? Try implementing these practices and see how much time you save. Download our voice memo naming convention template to get started with a pre-built system that works across all your devices.

    References

    Workflowy – the PARA method

  • How to Organize Voice Memos on Android, Quickly and Easily

    How to Organize Voice Memos on Android, Quickly and Easily

    Ever found yourself frantically scrolling through dozens of voice memos on your Android phone, desperately searching for that one important recording from last week’s meeting? You’re not alone. I once lost a brilliant business idea I’d recorded at 2 AM because it got buried under a mountain of grocery lists and random thoughts. That’s when I realized – having voice memos is only half the battle. The real challenge? Keeping them organized.

    Voice memos are like digital sticky notes for your brain. They capture everything from sudden inspiration to critical information when typing just isn’t practical. But without proper organization, they become a chaotic mess that defeats their whole purpose. Whether you’re a student recording lectures, a professional capturing meeting notes, or someone who just likes to think out loud, organizing your voice memos can transform them from digital clutter into a powerful productivity tool.

    The good news? Android offers multiple ways to organize voice memos on Android devices, from simple folder systems to AI-powered apps that practically organize themselves. This guide walks you through every method, tool, and strategy you need to turn your voice memo collection into a well-oiled machine.

    Understanding Android Voice Memo Basics

    Built-in Voice Recorder Features

    Most Android phones come with a pre-installed voice recorder app, though the name and features vary by manufacturer. Samsung calls it Voice Recorder, Google has Recorder, and OnePlus uses Voice Recorder too. These built-in apps typically offer basic recording functions – start, stop, pause, and save. Some newer versions include noise reduction and the ability to skip silences during playback.

    The interface is usually straightforward. You hit the red button to record, the square to stop, and that’s about it. But here’s where people get stuck – these default apps often save recordings with generic names like “Recording_001” or timestamps that mean nothing three months later.

    Default Storage Locations

    By default, Android saves voice memos in the internal storage, usually in a folder called “Recordings” or “Voice Recorder.” The exact path varies – on Samsung devices, you’ll find them in Internal Storage > Voice Recorder, while stock Android might place them in Internal Storage > Recordings. Some phones also create subfolders by date, which sounds helpful but actually makes finding specific recordings harder if you can’t remember when you made them.

    The files themselves are typically saved as M4A or AAC format, though some older devices still use MP3. These formats balance quality with file size, but they also mean your recordings take up more space than you might expect – a 10-minute recording can easily eat up 5-10 MB.

    Basic Organization Options

    Even basic recorder apps offer some organization features, though they’re often hidden or underutilized. Most allow you to rename recordings after saving them – just tap and hold on a recording, then select rename. Some apps let you add notes or descriptions to recordings, which becomes searchable later.

    Categories or labels are another common feature. You might see options like “Personal,” “Work,” or “Ideas” – or the ability to create custom categories. The problem? You have to remember to categorize each recording right after making it, which most of us forget to do when we’re in a hurry.

    Methods to Organize Voice Memos

    Creating Custom Folders

    The simplest organization method involves creating a folder structure that makes sense for your life. Using your phone’s file manager app, navigate to where your recordings are stored and start creating folders. Maybe you need “Work Meetings,” “Personal Reminders,” and “Creative Ideas.” Or perhaps organizing by project makes more sense – “Q4 Marketing Campaign,” “House Renovation,” “Book Notes.”

    To move recordings into these folders, select the files you want to organize, tap the move option, and choose your destination folder. It’s manual work upfront, but once you establish the habit of filing recordings immediately, finding them later becomes much easier.

    Naming Conventions Best Practices

    Generic recording names are organization killers. Instead of “Recording_047,” use descriptive names that tell you exactly what’s inside. A good naming convention might include the date, topic, and key participants. For example: “2024-03-15_TeamMeeting_BudgetDiscussion” or “2024-03-16_PersonalNote_BookIdeas.”

    Some people prefer putting the topic first for easier alphabetical sorting: “Budget_TeamMeeting_2024-03-15.” Whatever system you choose, consistency matters more than perfection. Pick a format and stick with it.

    Tagging and Categorization

    Tags offer more flexibility than folders because one recording can have multiple tags. If your recorder app supports tagging, use it liberally. A recording of a client call might get tagged with “client,” “project-alpha,” “follow-up-needed,” and “March-2024.”

    For apps without built-in tagging, you can create a workaround by adding hashtags to the file name or notes field. “#urgent #clientA #proposal” at the end of a filename makes recordings searchable even in basic file managers.

    Cloud Storage Integration

    Syncing your voice memos to cloud storage solves multiple problems at once. You get automatic backup, access from any device, and often better organization tools. Google Drive, Dropbox, and OneDrive all work well for this purpose.

    Set up automatic upload from your recorder app if it supports it, or use a sync app to automatically copy new recordings to the cloud. Once they’re in cloud storage, you can organize them using the desktop interface, which is often faster and more intuitive than doing it on your phone.

    Best Apps for Voice Memo Organization

    Google Keep

    Google Keep isn’t just for text notes – it handles voice memos beautifully. Record directly in the app, and Keep automatically transcribes your audio while keeping the original recording. You can add labels, colors, and pin important recordings to the top.

    The real magic happens with Keep’s search function. Because recordings are transcribed, you can search for words spoken in your memos, not just the titles. Integration with other Google services means you can easily share recordings to Docs or Gmail.

    Otter.ai

    Otter.ai takes voice memo organization to another level with AI-powered transcription and organization. It automatically identifies different speakers, creates summaries, and even pulls out action items from meeting recordings.

    The app organizes recordings into folders and lets you highlight important sections within transcripts. The free version gives you 300 minutes per month, which covers most personal use cases. Premium features include custom vocabulary for industry-specific terms and integration with Zoom for automatic meeting recording.

    Easy Voice Recorder Pro

    Easy Voice Recorder Pro focuses on organization from the start. It supports unlimited recording length, automatic cloud upload, and custom folders. The widget lets you start recording with one tap from your home screen, and you can set default save locations for different recording shortcuts.

    The Pro version adds features like stereo recording, adjustable recording quality, and the ability to continue recording even when the screen is off. The organization features include color-coding, custom tags, and bulk file operations for managing multiple recordings at once.

    Rev Voice Recorder

    Rev Voice Recorder combines basic recording with professional transcription services. While the app itself is free and includes decent organization features, you can order human transcriptions for $1.50 per minute when you need perfect accuracy.

    The app automatically backs up recordings to Rev’s servers and keeps them organized by date. You can share recordings directly from the app or download them in various formats. The transcription option makes it perfect for interviews, lectures, or any recording where you need a written record.

    Advanced Organization Techniques

    AI-Powered Transcription

    AI transcription changes everything about voice memo organization. Instead of listening to entire recordings to find what you need, you can scan transcripts in seconds. Apps like Whisper AI or online services like AssemblyAI offer accurate transcription that you can then search, edit, and organize.

    Set up a workflow where recordings automatically get transcribed and saved as text files alongside the audio. This creates a searchable archive of everything you’ve ever recorded. Some services even identify topics and create automatic summaries.

    Automated Categorization

    Automation apps like Tasker or IFTTT can organize your voice memos without any manual work. Create rules like “If recording is made between 9 AM and 5 PM on weekdays, move to Work folder” or “If recording is longer than 5 minutes, upload to cloud storage.”

    You can also use AI services that analyze transcripts and automatically categorize based on content. A recording mentioning “budget” and “quarterly” might automatically get filed under “Financial Planning.”

    Smart Search Features

    Modern file managers and specialized apps offer smart search that goes beyond simple filename matching. They can search within audio transcripts, find recordings by date range, duration, or even ambient sound characteristics.

    Some apps use acoustic fingerprinting to identify similar recordings or duplicates. This helps when you’ve accidentally recorded the same meeting twice or want to find all recordings from a particular location.

    Batch Processing

    When you’re dealing with hundreds of existing recordings, batch processing saves hours. Apps like Batch Rename can rename multiple files based on patterns. Audio processing apps can normalize volume levels, remove silence, or convert formats for an entire folder at once.

    Create processing templates for different types of recordings. Meeting recordings might get normalized and compressed, while music ideas stay in high quality. Personal reminders could be converted to smaller files to save space.

    Professional Organization Strategies

    Project-Based Organization

    For professionals juggling multiple projects, organizing voice memos by project creates clear boundaries and easier retrieval. Create a main folder for each project, then subfolders for different aspects – “Client Calls,” “Team Meetings,” “Ideas,” “To-Do Items.”

    Use project codes in filenames for quick identification. “PROJ001_ClientCall_2024-03-15” immediately tells you which project a recording belongs to, even if it somehow ends up in the wrong folder.

    Timeline Management

    Chronological organization works well for ongoing projects or personal journals. Create folders by year and month, then sort recordings by date within each folder. This method shines when you need to track progress over time or find recordings from a specific period.

    Add timeline markers to long recordings using apps that support bookmarks or chapters. Mark important moments in a meeting recording so you can jump directly to decisions or action items.

    Backup Solutions

    Never rely on a single storage location for important voice memos. Set up automatic backup to at least two different services – maybe Google Drive and Dropbox, or iCloud and OneDrive. Use different sync schedules to avoid overwhelming your data plan.

    Create archive folders for old recordings you want to keep but don’t need regular access to. Move these to cheaper cloud storage or external drives, keeping only recent and frequently accessed recordings on your phone.

    Cross-Device Syncing

    If you use multiple devices, consistent organization across all of them is essential. Cloud storage services handle this automatically, but make sure you’re using the same folder structure and naming conventions everywhere.

    Some apps offer their own sync services that preserve metadata like tags and categories that might get lost in simple file syncing. Choose apps that support your entire device ecosystem.

    Troubleshooting Common Organization Issues

    Storage Management

    Voice memos eat up storage faster than you’d think. Regular cleanup prevents your phone from running out of space at critical moments. Delete test recordings, trim silence from important files, and compress older recordings you’re keeping for reference.

    Set up automatic deletion rules for certain types of recordings. Maybe personal reminders get deleted after a week, while meeting recordings are kept for three months. Apps like Storage Analyzer help identify which recordings take up the most space.

    File Recovery

    Accidentally deleted an important recording? Stop using your phone immediately to avoid overwriting the data. Android file recovery apps like DiskDigger or Dr.Fone might recover recently deleted files if they haven’t been overwritten.

    For future protection, enable the recycle bin feature in your recorder app if available. This gives you a grace period to restore accidentally deleted recordings before they’re permanently gone.

    Sync Problems

    When cloud sync stops working, recordings can get scattered across devices with different versions. Check your sync settings, make sure you’re logged into the right account, and verify you have enough cloud storage space.

    If recordings won’t sync, try manually uploading them through the cloud service’s app rather than relying on automatic sync. Clear the cache of both your recorder and cloud apps to resolve stubborn sync issues.

    Performance Optimization

    Too many recordings can slow down your recorder app and file manager. If scrolling through recordings becomes sluggish, consider moving older files to archive folders or external storage.

    Regular app maintenance helps too. Clear the cache periodically, update to the latest version, and restart your phone if the recorder app starts acting weird. Some apps perform better with certain file formats, so experiment if you’re having issues.

    Tips for Long-term Voice Memo Management

    Regular Maintenance

    Set a weekly reminder to organize new recordings. It takes five minutes when done regularly but becomes a massive chore if you let recordings pile up for months. During this weekly session, delete unnecessary recordings, rename important ones properly, and move them to appropriate folders.

    Create a “To Process” folder for recordings that need transcription, editing, or further action. This keeps them separate from completed recordings while ensuring nothing gets forgotten.

    Archive Strategies

    Develop a clear policy for what gets archived and when. Maybe recordings older than six months move to archive folders, or completed projects get bundled and stored separately. Compress archive files to save space – you can always decompress them if needed later.

    Consider creating yearly archives that you can move to external storage. “2023_VoiceRecordings_Archive.zip” is easier to manage than thousands of individual files.

    Storage Optimization

    Different recording qualities serve different purposes. Meeting notes don’t need studio quality – lower bitrate saves space without affecting intelligibility. Music or creative recordings might need higher quality.

    Learn your recorder app’s quality settings and choose appropriately. A voice memo at 64 kbps sounds fine for speech and uses half the space of 128 kbps. For really long recordings like lectures, even 32 kbps might be sufficient.

    Security Best Practices

    Voice memos often contain sensitive information – personal thoughts, business discussions, or private conversations. Use app locks or folder encryption for sensitive recordings. Many file manager apps offer encrypted folders that require a password or fingerprint to access.

    Be careful with cloud storage permissions. Make sure shared folders don’t accidentally expose private recordings. Review sharing settings regularly and revoke access for people who no longer need it.

    Conclusion

    Organizing voice memos on Android doesn’t have to be complicated. Start with the basics – rename your recordings descriptively and create a simple folder structure. As your needs grow, explore advanced apps and automation techniques that can handle organization for you.

    The key is finding a system that fits your workflow and sticking with it. Maybe that’s using Google Keep for quick personal notes and Otter.ai for professional meetings. Or perhaps a simple folder structure with good naming conventions is all you need.

    Take action today. Choose one organization method from this guide and implement it for your next five recordings. Once that becomes habit, add another technique. Before long, you’ll have a voice memo system that actually helps instead of hinders your productivity.

    Remember, the best organization system is the one you’ll actually use. Start simple, stay consistent, and adjust as you learn what works for your specific needs. Your future self will thank you when you can find that important recording in seconds instead of minutes.

    References

    Exploring the Many Options That Make Recording Easy

  • How to Organize Voice Memos: Complete Guide to Audio File Management (2025)

    How to Organize Voice Memos: Complete Guide to Audio File Management (2025)

    Introduction

    Your phone buzzes with a brilliant idea at 2 AM. Half-asleep, you fumble for the voice memo app and record your thoughts before they disappear into the void of forgotten creativity. Fast forward three weeks later – you’re desperately scrolling through “New Recording 47,” “New Recording 48,” and dozens of other mysteriously titled audio files, trying to find that game-changing concept. If you’re wondering how to organize voice memos effectively, you’re definitely not alone in this digital audio chaos.

    The average smartphone user has over 30 disorganized voice memos cluttering their device, turning what should be a productivity tool into a source of frustration. I’ve been there too – frantically searching through recording after recording, knowing I captured something important but having absolutely no clue which file contains it.

    Voice memos have evolved way beyond simple reminders. They’re now tools for capturing interviews, lectures, creative brainstorms, and important conversations. But here’s the thing – without proper voice memo organization, these valuable audio files become nothing more than digital clutter that wastes your time and eats up storage space.

    That’s exactly why I put together this guide on how to organize voice memos. You’ll discover proven strategies to organize voice recordings across iPhone, Android, and Mac platforms. We’ll cover everything from creating efficient folder systems and naming conventions to leveraging transcription tools and cloud storage solutions. By the time you finish reading, you’ll have a streamlined audio file management system that makes finding any voice memo as simple as a quick search.

    What’s the best way to organize voice recordings?

    The best way to organize voice recordings involves a systematic approach combining folders, naming conventions, and metadata. Here’s the most effective method:

    1. Create categorical folders – Group recordings by project, date, or purpose (meetings, interviews, ideas)

    2. Use descriptive naming conventions – Replace generic names like “Recording 1” with specific titles like “Marketing Meeting_Jan15_2025”. More information on naming conventions for voice memos is available here.

    3. Add tags and metadata – Include searchable keywords like “urgent,” “follow-up,” or project names

    4. Mark favorites for quick access – Star frequently referenced recordings for instant retrieval

    5. Enable transcription – Convert audio to searchable text using built-in tools or apps like Otter.ai

    6. Implement regular cleanup – Archive old recordings and delete unnecessary files monthly

    This system works across iPhone, Android, and Mac platforms, making sure your voice recordings remain accessible and organized regardless of device.

    Why Voice Memo Organization Matters

    The Cost of Digital Clutter

    Here’s something that might surprise you – the average person spends about 12 minutes per day searching for misplaced digital files. When it comes to voice memos, that number jumps even higher because audio files are harder to scan quickly compared to text documents.

    Think about it this way: every minute you spend hunting through unnamed recordings is a minute stolen from actually productive work. Multiply that by the hundreds of voice memos most people accumulate over time, and you’re looking at hours of lost productivity each month.

    Productivity Benefits of Organized Audio Files

    When you organize voice memos properly, something magical happens. Your recordings transform from digital junk into a searchable knowledge base. I’ve seen journalists find specific interview quotes in seconds, students locate lecture notes instantly, and business professionals reference meeting decisions without breaking their workflow.

    Research from productivity experts shows that organized digital filing systems can reduce task completion time by up to 30%. That’s not just theory – it’s measurable time savings you’ll notice immediately once you implement a proper voice memo organization system.

    Storage Space Optimization

    Voice recordings eat up storage space faster than you might realize. A typical 10-minute voice memo can consume 10-20MB of space, depending on quality settings. When you’re dealing with dozens or hundreds of recordings, that adds up quickly.

    But here’s the kicker – most people never delete old voice memos because they’re afraid of losing something important. With proper organization and backup systems, you can confidently archive or delete outdated recordings, freeing up valuable storage space on your devices.

    iPhone Voice Memo Organization

    Using the Built-in Voice Memos App

    Apple’s Voice Memos app has come a long way from its basic beginnings. The current version includes folders, search functionality, and even basic transcription features that make organizing your recordings much easier than before.

    A more comprehensive guide for Voice Note organization for iPhone.

    Here’s what most people don’t realize – the Voice Memos app automatically syncs across all your Apple devices through iCloud. That means a recording you make on your iPhone instantly appears on your iPad and Mac. This cross-device functionality is huge for maintaining organized voice recordings across your entire Apple ecosystem.

    The app also includes some smart features like automatic location tagging and the ability to continue recordings from where you left off. These built-in organizational tools work best when you know how to use them properly.

    Creating Folders on iOS

    Setting up folders in the iPhone Voice Memos app is straightforward, but most people skip this step and regret it later. Here’s how to do it right:

    Step 1: Open Voice Memos and tap “All Recordings” at the top Step 2: Tap “Edit” in the upper right corner Step 3: Select “New Folder” and give it a descriptive name Step 4: Drag existing recordings into your new folder

    I recommend starting with broad categories like “Work,” “Personal,” “Ideas,” and “Interviews.” You can always create more specific subfolders as your collection grows. Apple allows unlimited folder nesting, so you can get as granular as needed.

    Pro tip: Create a “To Process” folder for new recordings that need to be renamed and categorized later. This prevents your main folders from getting cluttered with generically named files.

    Renaming and Managing Recordings

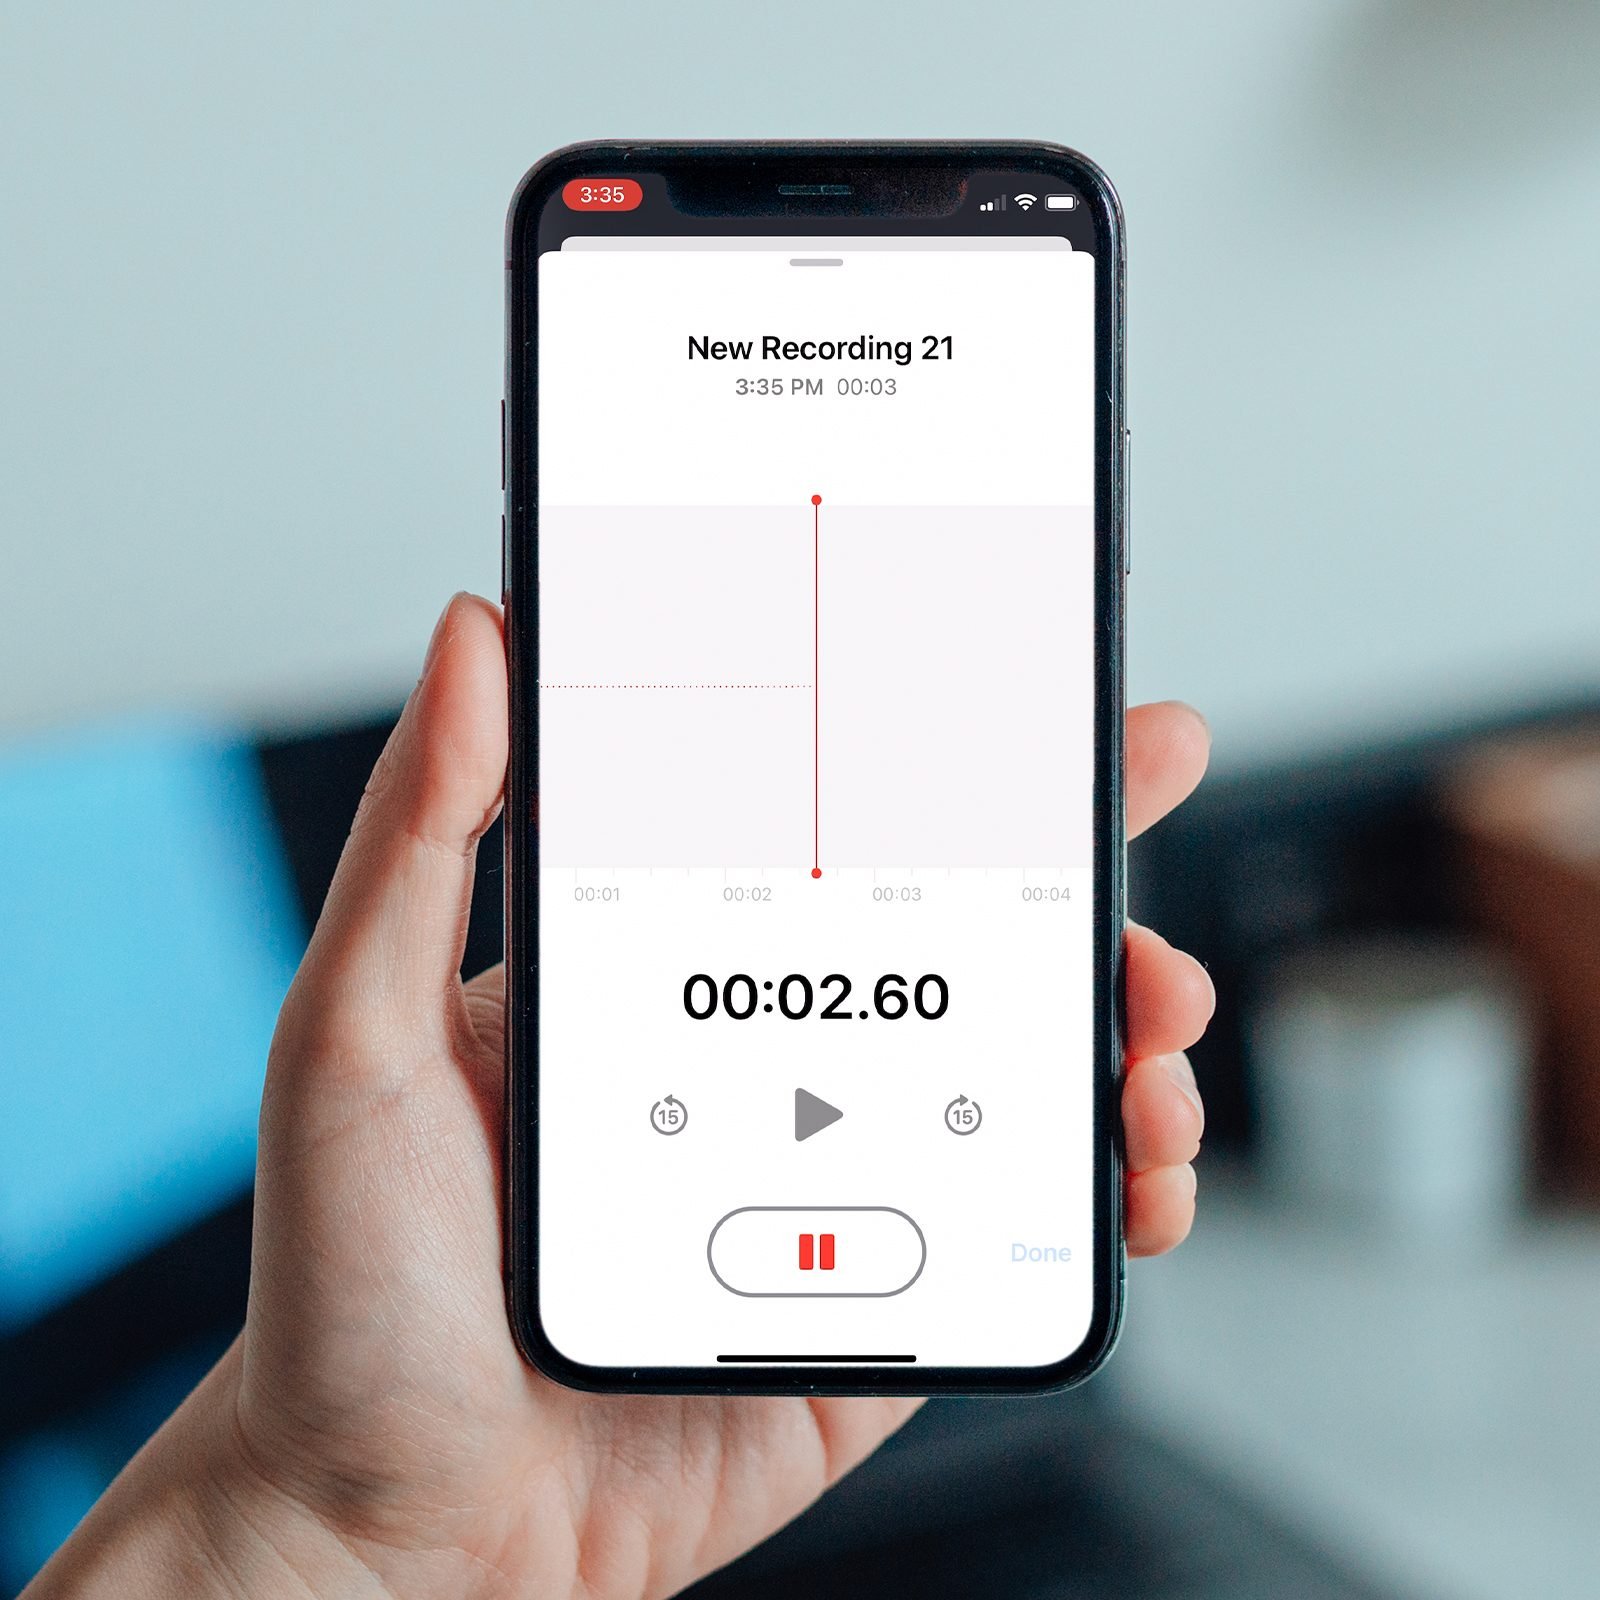
    The default naming system in Voice Memos is terrible for organization. Every recording gets named “New Recording” followed by a number, which tells you absolutely nothing about the content.

    Here’s how to rename recordings effectively:

    Step 1: Tap the recording you want to rename Step 2: Tap the current name at the top of the screen Step 3: Type your new, descriptive name Step 4: Tap “Done”

    For naming conventions, I use this format: “Category_Topic_Date” – for example, “Meeting_Budget_Review_Jan15” or “Interview_Marketing_Director_Jan20.” This system makes recordings instantly recognizable and searchable.

    You can also trim recordings directly in the app by tapping the edit button (looks like a magic wand) and adjusting the yellow handles. This helps keep file sizes manageable and removes dead air from the beginning or end of recordings.

    Sharing and Export Options

    The iPhone Voice Memos app makes it easy to share recordings through various channels. You can send them via Messages, Mail, AirDrop, or save them to Files for more advanced organization options.

    For backup purposes, I recommend regularly exporting important recordings to cloud storage services like Google Drive or Dropbox. While iCloud handles automatic syncing between Apple devices, having recordings in multiple cloud services provides extra security against data loss.

    The export feature also lets you choose different quality settings. For archival purposes, keep the original quality, but for sharing or storage optimization, you can export compressed versions that take up less space.

    More info on Voice Memo organizations for iPhone.

    Android Voice Memo Organization

    A more comprehensive guide on android voice memo organization is available here.

    Google Recorder vs. Third-Party Apps

    Android users have more options when it comes to voice recording apps, which can be both a blessing and a curse. Google’s Recorder app comes pre-installed on most newer Android devices and offers solid organizational features, but you might find better options depending on your specific needs.

    Google Recorder stands out because it includes real-time transcription and automatic speaker labeling. This makes it incredibly powerful for organizing recordings since you can search through transcribed text to find specific conversations or topics. The app automatically saves recordings with timestamps and lets you add custom labels.

    However, third-party apps like VoxDocs.me, Otter.ai, Rev Voice Recorder, or Simple Voice Recorder might better suit your workflow. Otter.ai excels at meeting transcriptions, while Simple Voice Recorder offers more manual control over file formats and storage locations.

    The key is picking one app and sticking with it. Jumping between different recording apps creates organizational chaos because each one stores files differently and uses different naming conventions.

    File Management on Android

    Android’s file system gives you much more control over where voice recordings are stored compared to iPhone. Most voice recording apps save files to a “Recordings” or “Voice Recorder” folder in your device’s internal storage.

    Here’s how to organize voice recordings at the file system level:

    Step 1: Open your device’s file manager app Step 2: Navigate to Internal Storage > Recordings (or wherever your app saves files) Step 3: Create new folders for different categories Step 4: Move recordings into appropriate folders

    I recommend creating a folder structure like this:

    • Recordings/
      • Work/
        • Meetings/
        • Interviews/
      • Personal/
        • Ideas/
        • Reminders/
      • Archive/

    You can also rename files directly in the file manager, which gives you more flexibility than some recording apps provide. Just remember to keep file extensions intact (.m4a, .mp3, etc.) so Android can still recognize them as audio files.

    Cloud Integration Options

    Android plays nicely with multiple cloud storage services, making it easy to automatically backup and organize voice recordings across different platforms. Google Drive integration works seamlessly since both are Google products, but you can also use Dropbox, OneDrive, or any other cloud service.

    Setting up automatic cloud backup prevents the heartbreak of losing important recordings when your phone breaks or gets lost. Most cloud services offer automatic folder syncing, so new recordings can automatically appear in your cloud storage within minutes.

    For Google Drive users, you can set up the Recorder app to automatically save transcriptions alongside audio files. This creates searchable text documents that make finding specific recordings much faster.

    Cross-Platform Compatibility

    One challenge with Android voice memo organization is maintaining compatibility when sharing files with iPhone users or switching between different devices. Android typically saves recordings in MP3 or M4A format, which works well across most platforms.

    If you frequently share recordings with iPhone users, stick with M4A format since it’s natively supported by Apple devices. For maximum compatibility across all platforms and devices, MP3 remains the safest choice, though file sizes will be slightly larger.

    Consider using cloud-based transcription services like Otter.ai or Rev that work across both Android and iOS. This way, your organizational system remains consistent even if you switch between different devices or platforms.

    Mac Voice Memo Organization

    Voice Memos App for macOS

    The Mac Voice Memos app is basically the iPhone app’s bigger, more powerful sibling. All your iPhone recordings automatically sync here through iCloud, but the Mac version gives you a much better interface for managing large collections of voice memos.

    The bigger screen makes it easier to see multiple recordings at once, and you can use keyboard shortcuts to navigate quickly through your collection. Command+F opens a search box that works across recording titles and transcribed text, making it lightning-fast to find specific content.

    What really sets the Mac app apart is how it handles longer recordings. You can scrub through audio with precise control using your mouse or trackpad, and the waveform visualization makes it easy to spot different sections of a recording. This is incredibly helpful when you’re dealing with hour-long meetings or interviews.

    Smart Folders and Automation

    Here’s where Mac voice memo organization gets really powerful – Smart Folders. These automatically collect recordings based on criteria you set, similar to how Smart Playlists work in iTunes.

    You can create Smart Folders that automatically gather:

    • All recordings from the last week
    • Recordings longer than 10 minutes
    • Recordings marked as favorites
    • Recordings containing specific keywords in their titles

    To create a Smart Folder, go to File > New Smart Folder and set your criteria. I use Smart Folders to automatically separate work recordings from personal ones, and to collect all recordings that need transcription or further processing.

    The Mac app also integrates with Automator and Shortcuts, letting you create workflows that automatically organize recordings based on complex rules. For example, you could set up an automation that moves all recordings containing “meeting” in the title to a specific folder and adds today’s date to the filename.

    Integration with iOS Devices

    The seamless sync between Mac and iOS devices is one of the biggest advantages of sticking with Apple’s ecosystem for voice memo organization. When you organize recordings on your Mac – renaming files, creating folders, marking favorites – those changes instantly appear on your iPhone and iPad.

    This bidirectional sync means you can capture recordings on your phone during the day, then organize and process them on your Mac when you get back to your desk. The larger screen and full keyboard make batch organization tasks much faster than trying to do everything on your phone.

    You can also use AirDrop to quickly transfer recordings between devices if you need them immediately without waiting for cloud sync. This is particularly useful when you’ve recorded something on your phone and need to edit or share it from your Mac right away.

    Advanced File Management

    The Mac gives you access to the actual audio files stored in your Voice Memos library, which opens up possibilities for advanced organization techniques. You can find these files by going to ~/Library/Application Support/com.apple.voicememos/ in Finder.

    From here, you can:

    • Copy recordings to external backup drives
    • Use third-party audio editing software like Audacity or GarageBand
    • Convert recordings to different formats using apps like Permute
    • Organize files using advanced metadata tags

    The Mac also makes it easier to work with large batches of recordings. You can select multiple files and rename them using patterns, or use third-party tools like Name Mangler to apply consistent naming conventions across hundreds of files at once.

    For power users, the Terminal offers even more organization possibilities. You can write scripts to automatically sort recordings by date, duration, or file size, making it possible to manage thousands of voice memos efficiently.

    Creating an Effective Naming System

    Naming Convention Best Practices

    Let’s be honest – most people’s voice memo naming is a complete disaster. “New Recording 1,” “New Recording 2,” “Audio 001” – these names tell you absolutely nothing about what’s actually in the file. Six months later, you’re playing audio roulette trying to find that one important recording.

    A good naming convention acts like a filing cabinet for your brain. It should tell you three things at a glance: what the recording contains, when it was made, and how important it is. The key is creating a system that works for your specific needs and sticking with it religiously.

    Here’s my go-to formula that works for most people: Category_Topic_Date_Status

    For example:

    • “Meeting_Budget_Review_Jan15_Action”
    • “Interview_Sarah_Marketing_Jan20_Transcribed”
    • “Idea_App_Feature_Jan22_Draft”

    This system front-loads the most important information so you can scan through recordings quickly. The category tells you the type of content, the topic gives you the specific subject, the date helps with chronological organization, and the status lets you know if follow-up work is needed.

    Date and Time Formatting

    Date formatting in filenames is where a lot of people mess up their organization system. Never use formats like “1/15/25” or “Jan 15, 2025” because these don’t sort properly in file systems.

    Always use YYYYMMDD format for dates: “20250115” instead of “01/15/25.” This makes sure your recordings sort chronologically when you view them in a file manager. If you need time stamps for multiple recordings on the same day, add HHMM at the end: “20250115_1430” for 2:30 PM.

    Some people prefer abbreviated month names like “Jan15” or “15Jan” because they’re easier to read quickly. That’s fine too, as long as you’re consistent. The worst thing you can do is mix different date formats – pick one system and stick with it.

    For recordings that span multiple days (like conference sessions), use the start date and add a session number: “20250115_Conference_Session01,” “20250115_Conference_Session02,” etc.

    Category-Based Naming

    Your category system should reflect how you actually use voice recordings. Don’t create 20 different categories if you only record three types of content. Start simple and add categories as your needs grow.

    Here are some category systems that work well for different types of users:

    Business Professional:

    • Meeting_
    • Call_
    • Interview_
    • Presentation_
    • Notes_

    Student:

    • Lecture_
    • Study_
    • Interview_
    • Research_
    • Reminder_

    Creative Professional:

    • Idea_
    • Interview_
    • Draft_
    • Review_
    • Inspiration_

    Journalist:

    • Interview_
    • Presser_
    • Background_
    • Soundbite_
    • Notes_

    The key is choosing categories that help you find recordings faster. If you’re a business professional who records both internal meetings and client calls, “Meeting_Internal_” and “Meeting_Client_” might work better than just “Meeting_.”

    Project-Specific Identifiers

    When you’re working on multiple projects simultaneously, adding project codes to your naming convention becomes incredibly valuable. This prevents recordings from different projects getting mixed up and makes it easy to gather all related audio files.

    Project identifiers work best when they’re short and memorable. Instead of “Customer_Relationship_Management_System_Redesign,” use something like “CRM2025” or just “CRM.” Here’s how it looks in practice:

    • “CRM_Meeting_Kickoff_Jan15”
    • “CRM_Interview_Users_Jan20”
    • “CRM_Review_Wireframes_Jan25”

    You can also use client names or codes if you’re working with multiple clients:

    • “ACME_Meeting_Requirements_Jan15”
    • “BETA_Call_Followup_Jan20”
    • “GAMMA_Interview_Stakeholder_Jan25”

    For long-term projects, consider adding phase identifiers:

    • “CRM_P1_Meeting_Discovery_Jan15” (Phase 1)
    • “CRM_P2_Interview_Testing_Mar15” (Phase 2)

    This level of detail might seem like overkill when you’re starting out, but when you have hundreds of recordings across multiple projects, these identifiers become lifesavers for quickly filtering and organizing your content.

    Using Transcription for Better Organization

    Built-in Transcription Features

    Most modern devices now include automatic transcription that turns your voice recordings into searchable text. iPhone’s Voice Memos app generates transcripts automatically, while Google’s Recorder app on Android provides real-time transcription as you speak.

    These built-in features aren’t perfect – they typically achieve 85-90% accuracy – but they’re good enough to make your recordings searchable. Instead of listening through entire files, you can scan transcripts to find specific topics or quotes.

    Third-Party Transcription Tools

    Apps like Otter.ai, Rev Voice Recorder, and Trint offer superior accuracy and additional features like speaker identification and custom vocabulary. Otter.ai excels at meeting transcriptions, while Rev provides human-level accuracy for important recordings.

    The trade-off is cost and processing time. Built-in transcription happens instantly and free, while premium services might take minutes or hours but deliver much cleaner results.

    Searchable Text Benefits

    Transcribed recordings become instantly searchable across your entire collection. Looking for that conversation about budget approval? Search “budget” and find every recording that mentions it, regardless of when it was recorded or how it was named.

    This transforms voice memos from a storage system into a knowledge database you can query like Google.

    Cloud Storage and Syncing Strategies

    iCloud for Apple Users

    iCloud automatically syncs Voice Memos across iPhone, iPad, and Mac, maintaining your folder structure and organization. Enable it in Settings > [Your Name] > iCloud > Voice Memos.

    Google Drive Integration

    Android users can set up automatic uploads to Google Drive, creating searchable backups with transcription text. This works particularly well with Google’s Recorder app.

    Backup and Recovery Planning

    Always maintain recordings in multiple locations. Local device storage, cloud backup, and periodic exports to external drives prevent losing important audio files.

    Advanced Organization Techniques

    Tagging and Metadata Systems

    Use your device’s built-in tagging features or third-party apps to add metadata like priority levels, action items, or project codes. This creates multiple ways to filter and find recordings.

    Batch Processing and Cleanup

    Schedule monthly sessions to rename, organize, and delete outdated recordings. Process new recordings weekly to prevent backlog buildup.

    Security and Privacy Considerations

    Sensitive recordings need encrypted storage and secure sharing methods. Consider apps with end-to-end encryption for confidential content.

    Conclusion

    Getting your voice memos organized might seem like a small thing, but it’s one of those changes that compounds over time. Instead of wasting minutes every day hunting through “New Recording 47,” you’ll have a system that actually works for you.

    Start simple – pick a naming convention, create a few basic folders, and stick with it for a month. Once that becomes habit, add transcription and cloud backup to the mix. Before you know it, your voice recordings will transform from digital clutter into a searchable knowledge base that actually helps your productivity instead of hurting it.

    The best organization system is the one you’ll actually use consistently. Pick the approach that fits your workflow, start small, and build from there. Your future self will thank you when you find that important recording in seconds instead of scrolling through dozens of unnamed files.

    References:

    Smartphone Voice Tools Tips

  • Voice Memo Organization Systems for iPhone Users

    Voice Memo Organization Systems for iPhone Users

    Voice memo organization systems can completely transform how you manage audio recordings on your iPhone. You know that sinking feeling when you’re frantically scrolling through dozens of voice memos, trying to find that brilliant idea you recorded three weeks ago? Maybe it was a business concept you had during your morning jog, or important details from a client call that you just can’t seem to locate. I’ve been there too – staring at a list of recordings titled “New Recording 47” and “New Recording 48” with absolutely no clue what’s inside them.

    Here’s the thing about voice memos: they’re incredibly powerful for capturing thoughts on the go, but without proper organization, they become a digital graveyard of forgotten ideas. Your iPhone’s Voice Memos app can hold thousands of recordings, but if you can’t find what you need when you need it, those recordings might as well not exist.

    The good news? Voice memo organization systems can transform your chaotic collection of audio files into a streamlined, searchable library that actually serves you. Whether you’re a busy professional juggling multiple projects, a student recording lectures, or someone who simply wants to remember their daily thoughts, the right organizational approach will save you hours of frustration and help you rediscover valuable content you thought was lost forever.

    These voice memo organization systems work specifically with iPhone’s built-in Voice Memos app, giving you practical strategies that require no additional software or complicated setups.

    Ready to turn your voice memo chaos into a well-oiled system? Let’s dive into proven strategies that will make your recordings work for you, not against you.

    Start with Smart Naming Conventions That Make Sense

    The foundation of any effective voice memo organization system starts with how you name your recordings. Think of file names as the front door to your content – they’re the first thing you see when searching, and they determine whether you’ll find what you need in 5 seconds or 5 minutes.

    Here’s the reality: “New Recording 23” tells you absolutely nothing about what’s inside. But “2024-08-19_ClientCall_ProjectAlpha_Budget” immediately tells you the date, type of content, project name, and topic. That’s the difference between organized and chaotic.

    The most effective naming convention follows this simple pattern: Date_Category_Project_Topic. This structure puts the most searchable information first and creates natural groupings when your recordings are sorted alphabetically.

    For example:

    • 2024-08-19_Meeting_TeamSync_Q4Goals
    • 2024-08-19_Idea_AppDevelopment_UserInterface
    • 2024-08-19_Personal_Shopping_GroceryList
    • 2024-08-19_Learning_Course_ChapterNotes

    The date format (YYYY-MM-DD) automatically sorts chronologically, while categories like “Meeting,” “Idea,” “Personal,” and “Learning” create instant visual groupings. This system works whether you have 50 recordings or 500.

    One trick that saves tons of time: if you frequently search for the same types of recordings, create a mental list of your “power keywords.” These are the 5-10 terms you use most often in searches. Make sure these words appear consistently in your recording titles.

    Integrate Voice Notes into Your Existing Workflow

    The biggest mistake people make with voice memo organization systems is treating them as separate from everything else they do. Your voice memos should connect seamlessly with your calendar, email, project management tools, and daily routines.

    Start by identifying the natural recording moments in your day. Maybe you record ideas during your commute, capture meeting notes between appointments, or log daily reflections before bed. These patterns become the backbone of your organizational system.

    Link your voice memos to specific projects or deadlines. When you record a memo about Project Alpha, immediately move it to the Project Alpha folder and consider sending yourself a quick email with the memo’s key points. This creates multiple touchpoints for the same information.

    Many professionals find success by treating voice memos as the first step in a larger content creation process. Record the raw idea, then transcribe key points into your project management system or meeting notes. The voice memo becomes your backup and your written notes become your action items.

    Daily Routine That Works

    Here’s a simple daily routine that keeps voice memos organized without feeling like extra work:

    Morning: Review yesterday’s recordings and move any that need immediate action to your priority folder Throughout the day: Use consistent naming as you record Evening: Spend 5 minutes organizing the day’s recordings into appropriate folders

    This 10-minute daily investment prevents the buildup that leads to organizational chaos later.

    Build Time-Saving Habits That Compound

    Small habits around voice memo organization create massive time savings over weeks and months. The secret is building systems that feel automatic rather than burdensome.

    The “record and organize immediately” habit is your biggest time-saver. When you finish recording, spend 30 seconds renaming the file with your standard convention and moving it to the right folder. Those 30 seconds save you 10 minutes of searching later.

    Create recording templates for common scenarios. If you frequently record client calls, develop a standard intro: “Client call with [Name] on [Date] regarding [Topic].” Speaking this information at the beginning means it gets captured in transcriptions and makes the content instantly searchable.

    Set up weekly reviews where you clean up any recordings that didn’t get properly organized. Friday afternoons work well for this – spend 15 minutes housekeeping your voice memo library while wrapping up the week.

    Automation Saves Hours

    Take advantage of Siri Shortcuts to automate parts of your organization process. You can create shortcuts that automatically name recordings based on your location, time of day, or calendar events. While this requires some initial setup, it eliminates decision fatigue around naming conventions.

    Consider using third-party apps that integrate with Voice Memos for additional automation features. Some apps can automatically transcribe recordings and extract keywords for easier searching.

    Maintain Consistency Across All Your Devices

    Your voice memo organization systems only work if they’re consistent everywhere you record. Whether you’re using your iPhone, iPad, or Mac, the same folder structure and naming conventions should apply.

    iCloud sync makes this easier by automatically syncing your Voice Memos across devices, but you need to maintain the same organizational discipline on each device. That means using the same folder names, following the same naming conventions, and organizing recordings immediately regardless of which device you’re using.

    Cloud Sync Strategy

    Enable iCloud for Voice Memos in Settings > [Your Name] > iCloud > Voice Memos. This ensures all your recordings and folder structures stay synchronized across devices automatically.

    Monitor your iCloud storage regularly since voice recordings can consume significant space. A 2-hour recording can take up to 1 GB depending on quality settings. Set up storage alerts so you don’t run out of space mid-recording.

    Remember that deleting a voice memo on one device removes it from all synced devices. Before deleting recordings, make sure you’ve extracted any valuable information or moved important memos to a backup location.

    Protect Your Voice Notes with Innovative Backup Systems

    Your voice memos contain valuable information – from business ideas to personal memories. Losing them because of device failure or accidental deletion can be devastating.

    iCloud provides automatic backup, but smart users create multiple backup layers. Export important recordings to other cloud services like Google Drive or Dropbox. This creates redundancy and makes recordings accessible even if you switch away from Apple devices.

    For recordings with sensitive information, consider local backups on your computer. The Voice Memos app on Mac makes this easy – just drag recordings to a folder on your desktop for offline storage.

    Develop a backup schedule that matches the importance of your content. Daily recordings might get weekly backups, while important business recordings should be backed up immediately after creation.

    Enable Team Collaboration Without Chaos

    Sharing voice memos with team members doesn’t have to destroy your organizational system. The key is creating shared standards that everyone follows.

    Use AirDrop for quick sharing between Apple devices, but establish rules about folder placement and naming when recordings get shared. The person receiving the memo should follow the same organizational standards as the original recorder.

    Team Best Practices

    Create shared naming conventions that include team member initials. Instead of just “2024-08-19_Meeting_ProjectAlpha,” use “2024-08-19_Meeting_ProjectAlpha_JD” (where JD represents the recorder’s initials).

    Establish ownership rules for shared recordings. Who’s responsible for organizing shared memos? Usually, the person who recorded the memo maintains organizational responsibility even after sharing.

    Set up shared folders for team projects, but keep personal recordings in individual folder structures. This prevents team content from cluttering personal organization systems.

    How Voice Memos Can Transform Your Workflow

    When properly organized, voice memos become more than just audio files – they become a searchable knowledge base that grows more valuable over time. Instead of losing brilliant ideas to poor organization, you’ll have instant access to months or years of captured thoughts.

    Voice memo organization systems change how you think about information capture. You’ll start recording more because you know you can find things later. This creates a positive feedback loop where better organization leads to more valuable content, which motivates better organization.

    The transformation happens gradually. Week one, you’ll notice you can find recent recordings faster. Month one, you’ll start rediscovering forgotten ideas. Month three, you’ll have a personal knowledge database that feels almost magical in its ability to surface relevant information exactly when you need it.

    Start Building Your Voice Note System Today

    The perfect time to start organizing your voice memos was when you recorded your first one. The second-best time is right now.

    Begin with your most recent recordings – apply the naming convention and folder structure to everything from this week. Don’t try to organize months of old recordings all at once; that’s a recipe for overwhelm and abandonment.

    Pick your naming convention format and write it down somewhere you’ll see it. The first few weeks require conscious effort to remember the new system, but after that, it becomes automatic.

    Create your initial folder structure based on how you actually use voice memos, not how you think you should use them. Your system should match your real behavior, not your ideal behavior.

    Most importantly, be patient with yourself as you build these new habits. Voice memo organization systems work best when they feel natural rather than forced. Start small, stay consistent, and watch your audio chaos transform into a searchable, valuable resource that actually serves your daily needs.

    Build Folder Structures That Grow with You

    Now that you’ve got smart naming down, it’s time to create folder structures that can handle your growing collection of voice memos. The iPhone Voice Memos app lets you create folders, and this feature is a game-changer for anyone serious about organization.

    Start with broad categories that reflect how you actually use voice memos. Most people fall into these main buckets:

    Work-Related Folders:

    • Client Calls
    • Team Meetings
    • Project Ideas
    • Training Notes

    Personal Folders:

    • Daily Thoughts
    • Shopping Lists
    • Health Logs
    • Book Notes

    The trick is to start simple and let your system evolve naturally. Don’t create 20 folders on day one – you’ll just end up confused about where things belong. Begin with 4-6 main folders and add more as you actually need them.

    When you’re deciding where a recording belongs, ask yourself: “If I needed to find this six months from now, where would I logically look first?” That’s your answer.

    Alternative Structure for Teams

    If you’re working with a team or sharing recordings across multiple people, consider organizing by project or client rather than by recording type. This structure works better when multiple people need access to the same information.

    Team-Friendly Structure:

    • Project Alpha
    • Project Beta
    • Client ABC
    • Client XYZ
    • General Team Updates

    This approach makes collaboration smoother because everyone knows exactly where to find recordings related to their specific work areas.

    Master the Art of Tagging and Quick Retrieval

    Here’s where things get interesting. While folders give you broad organization, tagging creates multiple pathways to the same content. Think of tags as the secret sauce that makes your voice memo organization systems truly powerful.

    The iPhone Voice Memos app doesn’t have traditional tagging, but you can create your own tagging system by including keywords in your memo titles. This is where that naming convention we talked about earlier becomes even more valuable.

    Let’s say you recorded a memo about a new marketing strategy during a client meeting. Your title might look like: “2024-08-19_Meeting_ClientABC_Marketing_SocialMedia_Q4Strategy”

    Now you’ve got multiple “tags” built right into the filename:

    • Meeting (content type)
    • ClientABC (who it involves)
    • Marketing (department)
    • SocialMedia (specific area)
    • Q4Strategy (time frame)

    This means you can search for any of these terms and find this recording instantly. It’s like having a filing cabinet where each document can live in multiple drawers at once.

    Another powerful technique is using consistent abbreviations for recurring themes. If you frequently record memos about budget discussions, always include “BUDGET” in the title. For strategic planning sessions, use “STRATEGY.” These consistent markers become your personal search shortcuts.

    The real magic happens when you combine this with the Voice Memos search function. Instead of scrolling through endless lists, you type one keyword and immediately see every relevant recording. That’s the difference between an organized system and a chaotic collection.

    Create Search Strategies That Actually Work

    Searching through voice memos shouldn’t feel like hunting for a needle in a haystack. The Voice Memos app on iPhone has a built-in search function that’s surprisingly powerful – if you know how to use it effectively.

    The search bar at the top of the Voice Memos app searches through your recording titles, so this is where your smart naming convention pays off big time. But here’s what most people don’t realize: you can search for partial words and the app will still find matches.

    Effective Search Techniques:

    Type broad categories first, then narrow down. If you’re looking for a specific client meeting, start by searching “client” to see all client-related recordings, then add more specific terms like the client name or date.

    Use date ranges in your searches. The app recognizes date formats, so searching “2024-08” will show all recordings from August 2024.

    Search by recording length if you remember roughly how long your memo was. Looking for a quick voice note? Search combined with folder filtering to narrow results.

    Remember that the search function looks through the entire title, so front-loading your most important keywords in your naming convention makes search results more relevant. That’s why the Date_Category_Project_Topic format works so well – it puts searchable information exactly where the search function expects to find it.

    One trick that saves tons of time: if you frequently search for the same types of recordings, create a mental list of your “power keywords.” These are the 5-10 terms you use most often in searches. Make sure these words appear consistently in your recording titles.

    References:

    How to quickly record voice notes on your iPhone

  • Transcribe Voice Memos on iPhone Easily

    Transcribe Voice Memos on iPhone Easily

    Want to transcribe voice memos on iPhone without using third-party apps? iOS 18 introduced native voice memo transcription, reducing reliance on external solutions for basic transcription needs. This comprehensive guide shows you exactly how to transcribe voice memos on iPhone using Apple’s built-in feature, plus advanced workflow options for power users.

    Why Transcribe Voice Memos on iPhone?

    Voice memo transcription transforms your spoken recordings into searchable, editable text. Whether you’re capturing meeting notes, brainstorming ideas, or recording interviews, learning how to transcribe voice memos on iPhone can significantly boost your productivity. The iOS 18 transcription feature works on all compatible iPhone models and doesn’t require Apple Intelligence.

    Key Features of iPhone Voice Memo Transcription

    When you transcribe voice memos on iPhone using iOS 18, you get access to several powerful features:

    No Time Limits: Unlike many other transcription services, Apple’s implementation doesn’t impose restrictions on recording length when you transcribe voice memos on iPhone.

    Real-Time Editing: You can modify transcriptions directly within the app using voice commands, making it easy to perfect your transcribed voice memos.

    Universal Compatibility: Available on all iPhones that support iOS 18, ensuring most users can transcribe voice memos on iPhone without needing newer models.

    Offline Processing: The ability to transcribe voice memos on iPhone works without constant internet connectivity for basic transcription tasks.

    How to Transcribe Voice Memos on iPhone: Step-by-Step Guide

    Method 1: Direct Transcript Access

    Follow these steps to transcribe voice memos on iPhone using the quickest method:

    1. Open the Voice Memos app on your iPhone
    2. Select the recording you want to transcribe
    3. Tap the three dots (⋯) in the top-right corner
    4. Choose “View transcript” from the dropdown menu
    5. The full transcription will appear in a new window

    This method is the fastest way to transcribe voice memos on iPhone when you need immediate access to your text.

    Method 2: Through Edit Mode

    An alternative approach to transcribe voice memos on iPhone:

    1. Open your desired voice memo
    2. Tap the three dots (⋯) in the top-right corner
    3. Select “Edit Recording”
    4. Tap the speech bubble icon in the bottom-left corner
    5. Access your transcription from this editing interface

    This method gives you more control when you transcribe voice memos on iPhone and need editing capabilities.

    Advanced Editing When You Transcribe Voice Memos on iPhone

    The transcription feature includes a unique real-time editing capability that enhances your ability to transcribe voice memos on iPhone accurately:

    1. In the transcript view, locate the red “Replace” button at the bottom
    2. Tap the button and start speaking your corrections
    3. The app will replace the transcript text in real-time as you speak

    Important Note: The replacement feature overwrites everything from your selected point forward, so it’s best used for correcting entire sections rather than individual words. For more extensive editing and document management when you transcribe voice memos on iPhone, you may find it easier to work with transcriptions in a word processor or document editor.

    Common Issues When You Transcribe Voice Memos on iPhone

    Accuracy Problems: If transcription quality is poor, try re-recording in a quieter environment. The ability to transcribe voice memos on iPhone works best with clear audio.

    Missing Transcripts: Ensure your iPhone has sufficient storage space and a stable internet connection for initial processing when you transcribe voice memos on iPhone.

    Sync Issues: Transcriptions sync across devices signed into the same iCloud account, but this may take time when you transcribe voice memos on iPhone and access them elsewhere.

    Availability and Requirements

    • iOS Version: iOS 18 or later
    • Device Compatibility: All iPhones that support iOS 18
    • Apple Intelligence: Not required
    • Internet Connection: May be needed for initial processing
    • Recording Length: No apparent time restrictions

    Workflow Integration Alternatives

    While iOS 18’s built-in transcription is convenient for quick access, many users find that copying and pasting transcriptions for further use can become tedious when they frequently transcribe voice memos on iPhone. For more streamlined workflows, consider solutions like VoxDocs, which allows you to email voice memos and have them automatically transcribed and appended to Google Docs. Similar automation is possible with third-party apps that integrate with Google Drive, automatically uploading and processing your recordings without manual intervention.

    These alternatives become particularly valuable for professionals who regularly transcribe voice memos on iPhone for business documentation, content creation, or research purposes.

    Tips for Better Results When You Transcribe Voice Memos on iPhone

    • Speak Clearly: Enunciate words for improved accuracy when you transcribe voice memos on iPhone
    • Minimize Background Noise: Record in quiet environments when possible to get cleaner results
    • Use Standard Speech Patterns: Avoid excessive filler words or long pauses for better transcription quality
    • Review Before Editing: Read through the entire transcription before making bulk changes
    • Optimal Distance: Hold your iPhone 6-12 inches from your mouth when recording for best results
    • Check Language Settings: Ensure your iPhone’s language settings match the language you’re speaking

    System Requirements and Compatibility

    To successfully transcribe voice memos on iPhone, you need:

    • iOS Version: iOS 18 or later
    • Device Compatibility: All iPhones that support iOS 18
    • Apple Intelligence: Not required to transcribe voice memos on iPhone
    • Internet Connection: May be needed for initial processing
    • Recording Length: No apparent time restrictions when you transcribe voice memos on iPhone
    • Storage Space: Adequate free space for processing transcriptions

    Getting Started Today

    This feature is available in the iOS 18 beta and will be included in the full release. Since it doesn’t rely on Apple Intelligence, it provides a reliable way to transcribe voice memos on iPhone across different iPhone generations. However, for users who need transcriptions integrated directly into their document workflows or collaborative platforms, exploring automated solutions that connect to cloud storage services may provide a more seamless experience than manual copying and pasting.

    Whether you’re a student, professional, or casual user, learning how to transcribe voice memos on iPhone can transform how you capture and utilize spoken information. The native iOS 18 feature makes this process more accessible than ever, while third-party solutions offer enhanced workflow integration for power users.

  • Why Transcribe Voice Memos: I Solved the Same Problem Three Times (And Never Knew It)

    Why Transcribe Voice Memos: I Solved the Same Problem Three Times (And Never Knew It)

    Understanding why you should transcribe voice memos can transform your productivity—but first, let me tell you about an embarrassing pattern I discovered that shows exactly why transcribing voice memos is essential.

    It started innocently enough. March 15th, during my morning coffee, I was frustrated with how long it took our team to onboard new clients. I grabbed my phone and recorded a quick voice memo: “What if we created a standardized checklist system that guides new clients through setup automatically? Could save us hours per client…”

    I felt good about capturing the thought. Made a mental note to think more about it later. Then life moved on.

    Two months later, May 22nd, I was stuck in traffic after a particularly difficult client call. Same frustration, same problem. I started recording: “We need some kind of automated system that walks clients through the initial setup process. Like a step-by-step guide that eliminates all the back-and-forth emails…”

    Again, I thought I was being productive by capturing the idea. Again, it disappeared into my growing collection of voice memos.

    August 8th. Another client onboarding headache. This time I was at the gym, between sets, when the solution hit me: “Why don’t we build an interactive onboarding portal? Clients could complete everything at their own pace, and we’d save tons of time on hand-holding…”

    Three separate moments. Three identical problems. Three virtually identical solutions. But because they were scattered across months of unorganized voice recordings, buried among grocery lists, random shower thoughts, and meeting notes, I never connected the dots.

    The realization came accidentally. I was cleaning up my phone storage and decided to finally tackle my voice memo collection. As I started listening to older recordings, I had that uncomfortable déjà vu feeling. Wait, hadn’t I already thought of this solution?

    When I found all three recordings, I felt simultaneously brilliant and incredibly stupid. Brilliant because I’d consistently identified the same core problem and arrived at the same smart solution. Stupid because I’d essentially wasted six months reinventing my own wheel.

    But it got worse. As I continued digging through my voice memos, I found I hadn’t just repeated the basic idea three times—I’d actually evolved it across multiple recordings:

    March 15th: Basic checklist idea April 3rd: Mentioned integration with our existing tools May 22nd: Automated step-by-step system June 18th: Client self-service component July 12th: Progress tracking for our team August 8th: Full interactive portal concept

    I had basically designed an entire solution piece by piece, memo by memo. But because everything stayed in audio format, scattered across dozens of recordings, I never saw the bigger picture. Each insight felt new instead of building on previous thoughts.

    This discovery forced me to confront an uncomfortable truth: How many other good ideas had I developed incrementally, only to lose them in the voice memo shuffle?

    I committed to transcribing my entire backlog. It took forever, but the patterns that emerged were fascinating. I wasn’t just having random business thoughts—I was systematically working through solutions to our most pressing challenges. I just never realized it because the pieces stayed disconnected.

    The manual transcription process revealed something important: my best thinking happened in fragments, building on previous ideas I’d completely forgotten about. Concepts that seemed unrelated in isolation became powerful when connected.

    But doing this manually wasn’t sustainable. I needed a system that would eliminate the transcription bottleneck entirely.

    That’s when I discovered VoxDocs—the simplest way to transcribe voice memos automatically.

    The beauty of VoxDocs is its simplicity. Every time I save a voice memo, it automatically transcribes it and appends the text to a Google Doc. No manual upload. No remembering to process recordings later. The transcription just happens seamlessly in the background.

    Having everything in one searchable Google Doc changed everything. Instead of scrolling through dozens of audio files trying to remember which one contained what idea, I could simply search for keywords like “onboarding” or “client setup” and immediately find every related thought I’d recorded over the past months.

    When I searched “onboarding” in my VoxDocs Google Doc, all six recordings appeared instantly. For the first time, I could see the evolution of my thinking laid out chronologically. What had felt like separate ideas were clearly building blocks of a comprehensive solution.

    The searchable format also revealed patterns I never would have noticed otherwise. I discovered I’d been circling around several other business challenges the same way—developing solutions incrementally across multiple recordings without realizing the connections.

    We eventually did build that client onboarding system, incorporating insights from all those “separate” voice memos. It’s saved our team hours each week and made the client experience much smoother.

    The funny thing is, I probably would have implemented the solution months earlier if I’d just been able to search my own thoughts. Sometimes the biggest barrier to solving a problem isn’t lack of ideas—it’s not being able to find the ones you’ve already had.

    Your best solutions might already exist in your voice memos, waiting to be discovered. Don’t let good thinking stay trapped in audio format where it can’t be found. Start transcribing your voice memos today.

  • Transcribe Voice Memos to Text in Seconds (5 Best Methods)

    Transcribe Voice Memos to Text in Seconds (5 Best Methods)

    You know that sinking feeling when you recorded a brilliant idea last week, but now you’re scrolling through dozens of voice memos trying to find it? Or worse—you remember recording something important, but the audio is so unclear you can’t understand your own words?

    You’re not alone. The average smartphone user has 47 voice memos buried in their device, and 73% of them never get listened to again. That’s potentially hundreds of valuable thoughts, meeting notes, and creative sparks lost forever.

    Quick Answer: How to Transcribe Voice Memos to Text

    The fastest way to transcribe voice memos: iPhone users can use the built-in transcription in iOS 17+ Voice Memos app, while Android users should try Google Voice Typing (free). For professional accuracy and automated workflows, paid services like Rev ($1.25/minute) or VoxDocs ($7/month for Google Docs integration) deliver superior results without the manual hassle.


    Why Your Voice Memos Are Failing You (And How Transcription Fixes Everything)

    Think about the last time you actually went back and listened to a voice memo from three months ago. Exactly—it probably never happened. Here’s why audio recordings are productivity quicksand:

    The Hidden Costs of Audio-Only Notes:

    • Search Nightmare: Try finding “that idea about customer retention” in 30 audio files
    • Time Drain: Listening to a 5-minute recording takes… 5 minutes (revolutionary math, right?)
    • Sharing Struggles: Ever tried emailing a voice memo to your team? Awkward.
    • Battery Vampire: Playing audio files repeatedly kills your phone faster than a TikTok binge

    The Transcription Game-Changer:
    Text transforms those scattered audio thoughts into searchable, shareable, actionable content. See this post on why transcribe voice memos, for an illustrative story on the hidden costs of losing voice memos. Suddenly, that brilliant 2 AM idea about improving your morning routine becomes part of your productivity system instead of digital dust.

    For users specifically working with Google Docs, understanding why Google Docs voice typing falls short can help you choose better alternatives. Writers, in particular, benefit from specialized dictation software designed for their unique workflow needs.

    The Free Route: Built-in Phone Features That Actually Work

    iPhone Users: Your Hidden Transcription Superpowers

    Method 1: The iOS 17 Magic Trick
    Apple quietly revolutionized voice memo transcription, but most users don’t even know it exists.

    Here’s the step-by-step process:

    1. Open Voice Memos and tap any existing recording
    2. Look for the “Transcript” button (it’s easy to miss)
    3. iOS automatically converts speech to text
    4. Tap and copy the text to use anywhere

    Note: This feature requires iOS 17 or later and may not be available in all regions.

    Real Example: Sarah, a marketing manager, uses this to transcribe client feedback during commutes. She records 15-minute voice memos while driving, then copies the transcript directly into her project management tool when she arrives at the office.

    Method 2: The Siri Dictation Workaround
    When iOS transcription isn’t available, this clever hack works on any iPhone:

    1. Open Notes app and start a new note
    2. Tap the microphone icon on your keyboard
    3. Play your voice memo while holding your phone near the speaker
    4. Siri converts the audio to text in real-time

    This method works on any iPhone and involves playing your voice memo while using Siri’s dictation feature, though writers may prefer dedicated dictation software for better results.

    Pro Tip: This works best in 2-minute chunks. Pause, rewind, and repeat for longer recordings.

    More information on iPhone Voice Memo Transcription

    Android Users: Google’s Free Transcription Arsenal

    Method 1: Google Live Transcribe (The Underrated Champion)
    Google’s Live Transcribe app is shockingly good for a free tool:

    1. Download from Google Play Store (completely free)
    2. Open the app and grant microphone permissions
    3. Play your voice memo recording
    4. Watch real-time text appear on screen
    5. Copy and paste into any app

    Real Example: David, a freelance writer, uses Live Transcribe to convert interview recordings into draft articles. He estimates it saves him 4 hours per week compared to manual typing.

    Method 2: Google Voice Typing with Voice Memos

    This method uses Google’s built-in voice recognition while playing recordings. However, google voice typing has many problems, and there are better alternatives available:

    1. Open Google Docs, Keep, or any app with voice typing
    2. Tap the microphone icon in the keyboard
    3. Play your voice memo recording near your Android device
    4. Google Voice Typing converts the audio to text automatically

    Live transcription while recording is very inconvenient for many use cases. It interferes with the flow of speech, for example. Consider trying something better than Google Voice Typing.

    Method 3: Google Recorder App Integration
    If you recorded using Google’s Recorder app, transcription might already be waiting:

    1. Open Google Recorder
    2. Select your recording
    3. Look for the transcript icon (looks like lines of text)
    4. Copy the pre-generated transcript

    Web-Based Solutions: When Phone Apps Aren’t Enough

    Sometimes you need more power than built-in phone features provide. These web-based options bridge that gap:

    Google Docs Voice Typing Hack:

    1. Open Google Docs in your browser
    2. Go to Tools > Voice Typing
    3. Play your voice memo through your phone’s speaker
    4. Google Docs transcribes in real-time

    The Otter.ai Free Tier Strategy:
    Otter.ai gives you 600 free minutes monthly—enough for most casual users:

    • Upload voice memo files directly through their website
    • Get back formatted transcripts with timestamps
    • Export to your favorite note-taking app

    Transcribing voice memos to google docs involves recording the audio, using dedicated transcription services, then AI post-processing for cleanup before importing to Google Docs. This multi-step approach ensures higher accuracy than direct methods like google voice typing. VoxDocs.me automates this process.

    Professional-Grade Solutions: When Accuracy Matters

    Free methods get you 80% there, but some situations demand perfection. Here’s when to consider paid services:

    VoxDocs.me: The Google Docs Automation Game-Changer

    Perfect for: Anyone who lives in Google Docs and wants zero-effort transcription

    VoxDocs connects directly to your voice memo app and automatically transcribes recordings into Google Docs. No uploading, no copy-pasting, no manual workflow.

    How it works:

    1. Connect your voice memo app to VoxDocs
    2. Record voice memos as usual
    3. Transcripts appear in Google Docs automatically
    4. Edit and organize from any device

    Real Example: Jennifer, a consultant, records client insights during site visits. By the time she’s back at her desk, formatted transcripts are already waiting in her Google Drive, organized by client and date.

    Investment: $1 trial, then $7/month (less than one fancy coffee per month)

    Rev: The Accuracy Perfectionist

    Perfect for: Business meetings, interviews, legal documentation

    Rev offers both AI transcription (fast and cheap) and human transcription (slow but 99% accurate):

    • AI Service: $0.25/minute, ready in minutes
    • Human Service: $1.25/minute, 24-hour turnaround

    When to choose Rev: Your voice memo contains critical business information, multiple speakers, or technical terminology that AI might misinterpret.

    Otter.ai Pro: The Meeting Maven

    Perfect for: Regular meeting recordings and team collaboration

    Otter.ai’s paid plans excel at speaker identification and real-time transcription during live conversations:

    • Identifies up to 10 different speakers
    • Integrates with Zoom, Teams, and Google Meet
    • Creates shareable transcripts with timestamps

    The Smart Upgrade Path: Start with Otter’s free tier (600 minutes monthly). If you consistently hit that limit, upgrade to Pro for unlimited transcription.

    Maximizing Transcription Accuracy: The Recording Secrets

    Even the best transcription service can’t fix terrible audio. These techniques dramatically improve your results:

    The 6-Inch Rule

    Hold your phone 6-8 inches from your mouth. Closer creates distortion; farther reduces clarity.

    The Pause Strategy

    Instead of saying “um” or “uh,” simply pause. Silence transcribes better than filler words.

    The Room Selection

    Record in rooms with carpet, curtains, or furniture. Hard surfaces create echo that confuses transcription algorithms.

    Before/After Example:

    • Bad: Recording in your car during traffic (background noise + echo)
    • Good: Recording in your bedroom before bed (quiet + soft furnishings)

    The Topic Statement Technique

    Start every voice memo with: “This is about [main topic].” This gives transcription services context and improves accuracy for technical terms.

    Troubleshooting: When Transcription Goes Wrong

    Problem: Transcription shows gibberish instead of words
    Solution: Your audio might be too quiet. Re-record while speaking closer to your phone’s microphone.

    Problem: Technical terms come out as random words
    Solution: Spell out important terms phonetically. Say “S-A-A-S software” instead of just “SaaS software.”

    Problem: Multiple speakers create confusion
    Solution: Use services like Otter.ai that offer speaker identification, or record separate voice memos for different people.

    Advanced Workflows: From Voice to Value

    The Content Creator’s Pipeline

    1. Record voice memo ideas during inspiration strikes
    2. Batch transcribe weekly using Descript
    3. Transform transcripts into blog outlines using the best dictation software for writers
    4. Publish polished content 3x faster than traditional writing

    The Student’s Study System

    1. Record lecture highlights as voice memos
    2. Transcribe using Otter.ai’s free tier
    3. Import transcripts into note-taking apps like Notion
    4. Create searchable study guides from multiple lectures

    The Professional’s Meeting Machine

    1. Record key discussion points during meetings
    2. Use Rev’s human transcription for important decisions
    3. Convert transcripts into action items
    4. Share formatted notes with team within hours

    For Writers and Authors

    Professional Writing Workflow:
    Professional writers can streamline their creative process using specialized dictation software designed for writers, which offers features specifically tailored to long-form content creation.

    Privacy and Security: Protecting Your Voice Data

    The Reality Check: When you upload voice memos to transcription services, you’re sharing potentially sensitive information with third parties.

    Smart Privacy Practices:

    • Use local transcription (phone built-ins) for confidential content
    • Check data retention policies before uploading sensitive recordings
    • Consider paid services with stronger privacy commitments for business use
    • Delete uploaded files from transcription services after downloading transcripts

    Red Flag Warning: Never upload voice memos containing passwords, social security numbers, or confidential business information to free web services.

    The Future Is Speaking: What’s Coming Next

    Transcription technology is evolving rapidly. Here’s what’s on the horizon:

    Real-Time Everything: Soon, your voice memos will be transcribed automatically as you record them, with perfect accuracy and instant searchability.

    Context-Aware AI: Future transcription will understand the subject matter and automatically format your transcripts as meeting notes, creative briefs, or technical documentation.

    Universal Integration: Every productivity app will have native voice memo transcription, eliminating the copy-paste workflow entirely.

    Your Next Step: Stop Procrastinating, Start Transcribing

    The perfect transcription method doesn’t exist—but the method you actually use does.

    Your 5-Minute Action Plan:

    1. Test your phone’s built-in features right now (iOS 17 transcription or Google Live Transcribe)
    2. Record a 2-minute voice memo about your goals for next week
    3. Transcribe it using your chosen method
    4. Save the transcript in your preferred note-taking app
    5. Compare the time saved versus typing the same content manually

    If built-in features meet your needs, you’re done. If you need professional accuracy or automated workflows, try VoxDocs for Google Docs integration or Rev for critical transcriptions.

    Quick Recommendations by Use Case:

    • Casual Personal Use: Start with your phone’s built-in dictation features
    • Google Docs Users: VoxDocs for automated integration ($7/month, very affordable)
    • Students: Google Live Transcribe (Android) or Otter.ai free tier (iPhone)
    • Business Professionals: Rev or SpeakWrite for accuracy-critical content
    • Content Creators: Descript for transcription plus editing capabilities
    • International Users: Sonix for multi-language support

    The Bottom Line: Every voice memo sitting untranscribed in your phone represents lost potential. Whether you choose free built-in features or invest in professional services, the goal is the same—transform scattered audio thoughts into organized, actionable text that actually improves your productivity.

    Stop losing your brilliant ideas to digital clutter. Start transcribing your voice memos today, and watch your productivity soar while your stress levels plummet.

    Ready to reclaim those lost thoughts? Pick your transcription method and record your first voice memo in the next 60 seconds. Your future self will thank you.

  • Better Google Docs Voice Typing

    You’ve probably tried Google Docs Voice Typing and found it lacking. VoxDocs is better Google Docs Voice Typing.

    VoxDocs gives you complete control over your output formatting – customize punctuation placement, control line breaks, and structure paragraphs exactly how you want them. It also automatically generates summaries for longer content, automatically appends transcriptions to a single Google Docs file in your account, and works with your phone’s existing voice app without requiring any app downloads. VoxDocs is far more convenient than Google Docs Voice Typing.

    Quick Overview

    VoxDocs

    ✅ Control over formatting – customize punctuation, line breaks, and paragraph structure.
    ✅ Intelligent text organization with automatic summaries and error detection.
    ✅ Auto-saves transcriptions without needing a separate app – works with your phone’s built-in voice features.

    Google Voice Typing

    ✅ No additional cost and built into Google Docs.
    ✅ Live transcription with basic voice controls.

    Side-by-Side Analysis

    CapabilityGoogle Voice TypingVoxDocs
    Device compatibilityUniversal device supportUniversal device support
    Application integrationGoogle docs onlyWorks with built-in voice apps
    Output customizationFull control over punctuation & formatting. Add summaries as needed, etc.
    Content organization
    Installation processon gdocs appNo download – uses existing voice features
    Pricingno charge$1 for the first month. A mocha-latte a month after.


    The Assessment

    Google Voice Typing

    Google’s built-in dictation costs nothing and requires zero setup. BUT inconsistant formatting and inconvenient UI can make it unusable.

    Google Voice Typing strengths:

    • Zero cost and ready-to-use: Already available in Google Docs and Slides without downloads.
    • Instant transcription: Words appear immediately as you speak, maintaining natural rhythm.
    • Basic voice controls: Essential punctuation and formatting commands reduce keyboard dependency.

    Google Voice Typing limitations:

    • Unreliable punctuation: Command timing issues often require manual punctuation cleanup after every dictation session.
    • Inconsistent accuracy: Accents or rapid speech frequently cause transcription errors, and the small keyboard microphone button is difficult to use when you’re walking or multitasking.
    • Poor mobile interface: I found it frustrating when trying to dictate on the go – the tiny mic button on the keyboard is hard to tap accurately.

    VoxDocs

    VoxDocs solves the common problems that make Google Voice Typing frustrating to use. Instead of dealing with inconsistent formatting and unreliable transcription, you get control over how your text appears.

    The interface is designed for real-world use – no more fumbling with tiny microphone buttons on your keyboard when you’re on the go. VoxDocs leverages your phone’s own microphone system, making voice input as natural as making a phone call.

    VoxDocs advantages:

    • Uses your phone’s built-in voice app: Skip the awkward keyboard mic button entirely – just speak naturally using your device’s primary voice system.
    • Complete formatting control: Decide exactly where punctuation goes, control line breaks, and structure paragraphs the way you want them every time.
    • Intelligent content processing: Automatically organizes and corrects dictated content, with built-in summary generation that turns long voice memos into concise, actionable text.
    • Auto-save functionality: Your words are captured and saved automatically as you speak – no risk of losing your thoughts mid-sentence.
    • Adaptive communication style: Recognizes context and adjusts tone accordingly – formal for emails, casual for messages.
    • Voice-powered editing: Continue using your voice to refine content, create bullet lists, or generate summaries without touching the screen.

    Making the Case for VoxDocs

    Speak naturally and see your thoughts transformed into well-formatted text. Control how punctuation appears and where line breaks occur. VoxDocs reduces formatting work and typos while giving you control over how your text appears.

    Work at the speed of thought without typing. Let the software handle formatting, spelling, and structure while automatically generating summaries of longer content. Simply think, speak, and your work is saved automatically.

    VoxDocs adapts to your communication style while giving you formatting control. From brief messages to longer documents with auto-generated summaries, express yourself naturally and VoxDocs captures your intended meaning with your preferred formatting.

    No downloads required – works with your existing setup using your phone’s built-in voice features. Use voice input to handle messages, generate content with automatic summaries, and improve productivity without learning new apps.


    Sign up for voxdocs

  • Transcribe Voice Notes to Google Docs – Better Than Voice Typing

    Voice notes are incredibly convenient for capturing ideas on the go, but getting them transcribed into Google Docs can be frustrating. After struggling with Google’s built-in voice typing (especially on mobile where new line commands often do not work at all), I developed a workflow that actually works.

    My Transcription Workflow

    Here’s my step-by-step process for transcribing voice notes to Google Docs:

    1. Record the voice note on my phone
    2. Send to WhatsApp – I message it to myself
    3. Download the audio file from WhatsApp
    4. Transcribe using a dedicated transcription service
    5. Post-process with AI (Claude or ChatGPT) to clean up the text
    6. Copy and paste the final result into Google Docs

    Why This Workflow?

    Google Docs’ voice typing has significant limitations:

    • Poor transcription accuracy
    • Mobile functionality can be is broken (new line voice command did not work for)
    • Limited editing capabilities during dictation

    Third-party transcription services consistently deliver better results than Google’s built-in options.

    Transcription Services to Consider

    Several reliable transcription tools can handle this step:

    • Otter.ai
    • Rev.com
    • Whisper (OpenAI)
    • Trint
    • Happy Scribe

    The Automated Alternative

    If this manual process feels too cumbersome, voxdocs.me automates the entire workflow from voice note to Google Doc, eliminating all the manual steps. Voice notes are automatically transcribed, post-processed with AI according to your custom prompt, and appended to a Google Doc in your account.

    Bottom Line

    While Google’s voice typing seems like the obvious solution, dedicated transcription services paired with AI post-processing deliver significantly better results. The extra steps are worth it for clean, accurate text that actually captures your ideas properly.